Thursday, June 25, 2009

Acapella - Rain in Africa

If you like acapella you'll really like this.

Sunday, June 21, 2009

Smoke and photoshop

The week's assignment for the Flickr group 
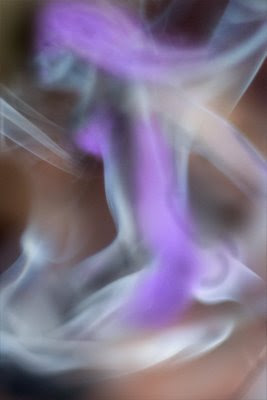
PCA was smoke. The idea to find a way to photograph and present smoke in an image.

We were encouraged to do any post processing we liked and although I originally didn't think of doing a lot of post-processing, it happened anyway.

In he final image the drifting smoke looks a lot like a woman kneeling and looking to the left

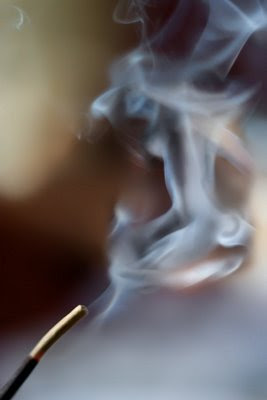
The setup was basically an incense stick in a holder set on a small table with one of my sons on a couch in the background. The light was through the window to the left, but since it was overcast it wasn't particularly stark.

I took over 100 images some really close and other further away from the incense stick and when I looked at them afterward there were several that looked pretty interesting - some with smoke around the bottom, one that had a small wisp that looked like a face in profile and one of them looked a little like a female torso. It even had a small piece of the hips and top of the thighs.

I wondered how easily I could put them all together to make a composite that looked like a kneeling woman. My first instinct was to use the overlay techniques that I mentioned last week (for the 
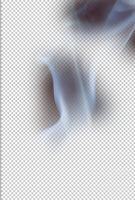
Coyote image that I did) so I went off looking for an image of a woman that I could overlay in there.... Not much luck - the smoke is too translucent to use in overlay (although I am sure there is a way, I couldn't find it).

The next step was to figure out how to make a composite.

There is an important step to making a composite image that many people don't use and that makes a huge difference in flexibility and how much control you have over the final image. This is to never adjust the original image, but rather the use "masks" for that purpose.

Photoshop Elements doesn't have "masks" per se, but you can fake a mask by doing the following: Get the image layer and create a blank layer below it. Then use the Layer->Group option on the image layer so that it is grouped to the blank layer below.

An example of this is this one with the end result shown next to it. You paint in black on the bottom layer to bring out the details of the image that is grouped above. If you don't like it, you erase the black and it hides it again.


So bringing in three or four of these images and masking parts of them, I ended up with something that looked like a fairly convincing kneeling woman.

The image below is a screenshot from Photoshop Elements showing this and the layers on the right that were used to produce it. You can click on the image to view it large.


All that was left was to fill in some details to complete the image. The hair looked a little sparse and since this is a woman I needed to manufacture a breast profile and put some detail into the face.

It important to do this in a new layer so that if you make a mistake you can erase it and more importantly, after you are finished if you realize that the overall effect of these additions makes the figure too contrived, you can back it off by reducing the opacity.

I have included a screenshot of this adjusted layer - but I changed the color to make it obvious what these last touchup changes were. If you compare it with the final result you will see that I backed off the touchups quite a bit.

Sunday, June 14, 2009

Inspecting the bees


Inspecting the bees
Originally uploaded by bowtoo
My wife keeps bees and had a hive opening and meeting at our house this weekend.

Here a frame is inspected. This frame has a lot of capped honey cells.

The first part of the season you allow the hive to build itself up. Then you add extra frames on top with a mesh that excludes the queen but allows workers through. As natural hoarders, the bees will begin to store honey in the frames that the queen can't get to.

The queen excluder prevents her from moving up to lay eggs so that only honey is stored there.

Scary parent

My son told me recently that most of his friends are afraid of me.... which is pretty strange considering how mild-mannered I am.

Scary parent


To create this image, I used a photograph that I took at a local Zoo a couple of months ago of a coyote.

The coyote in the cage had a very obvious wire mesh pattern as the background so I used Photoshop elements to select and remove the animal from the background.

Selecting a furry creature in photoshop gets you 80% done - the rest involves finding a way to get the stray hairs and ragged edges to look real - because the selection tends to ignore those finer details.
Once you have the animal isolated from the background you can use it elsewhere. The face is facing a little to the left even though the eyes are looking directly at the camera. So the next step was to get a photograph of a person with the same pose.

I usually try to get my sons to pose for me for these experiments but they were out so I put the camera on self timer and took a couple of images of myself in the back yard with a stern expression. There was a strong side-light in my recent image, with plenty of light from behind as well. In the original as you can see there is a strong backlight lighting the edges of the fur.


I needed to repeat the process with this image to isolate my face from the background and then bring both of these images into photoshop and align them properly.

As you can see, Coyotes' eyes are front facing like ours (trying to do this with an antelope or buck is tougher because their eyes are wider and on the sides of their heads). By resizing and rotating (very slightly because I deliberately matched where I was looking in the more recent photograph) I was able to line up the eyes perfectly. To do this, you put the coyote on a layer below the human face and set the face layer at 50% opacity so that you can see both images at once.


The coyote mouth is lower in its face than mine is so I needed to create a new layer and on that clone my mouth to move it down a bit.

I erased all but the face from the coyote picture and the same from the background human image and set the human face image to overlay which merges the tones of the two. You can dial in more face or more coyote by sliding the opacity slider of the human (overlay) layer. I went for a strong enough overlay so that you can still see the human skin tone through the fur.


The screenshot above shows the layers on the right - I had both the original images as layers as well as the various cloning and adjustment layers. I simply hide the ones that I don't need while I am working.

After you have the face ready you can bring in the background image that you will use. You have to selectively erase the "overlay" layer eyes and mouth so that the eyes and cloned mouth are visible instead.

Now some cloning on the background image. Firstly to hide the top of the head and then to block off all the bright lights that distract from the subject.

Some final touchups on the fur, cloning from the original Coyote where necessary and using a brush to darken the edges of the eyes. I had some trouble with this, but ended up using a brush set to multiply and an opacity of 20% to get the right effect. It still looks as though I have makeup on.


Saturday, June 13, 2009

Sipping a Honeydew Drop (One More Ant Photo)

Now this is macro photography.

A friend of mine from our local camera club took this image with a ring flash and a macro lens.

It is very impressive.

Monday, June 1, 2009

Big spider for New England


Big spider for New England
Originally uploaded by bowtoo
A word about insects in North Eastern America.

The first thing to know is that most of them are vicious. I think that this is because they have such a short time to be active that they come out in the spring and bite. Most of the insects (especially the small flying ones) bite.

The mosquitoes are almost unbearable at certain times of the year (there is lots of standing water around) and there are blue flies (essentially horse flies) on the beaches from May to June.

There aren't many big spiders though... so tonight when we saw this one it was the center of some attention. Of course I had to record it.... as a photographer it is very important to try to get a "catchlight" in the eye of the person who's portrait you shoot so I was quite proud to get one in one of eyes of this guy.

Shot with my 50mm lens with a macro extension to get me really close.

Catching a Hummingbird


Hummingbird
Originally uploaded by bowtoo
We have a hummingbird feeder stuck to the window of our living room.

For two years now a few hummingbirds have returned to this feeder. We have learned that they come back to the same nest every year and need to consume large amounts of nectar to survive - feeding about once every 45min.

They migrate to and from Central America, across the Gulf of Mexico in the spring after consuming large numbers of insects and almost doubling their weight.

The adult bird is very small. Their nest is the size of an American Quarter (South African 50c piece) and the are probably about 3in (8cm) long from tip to tail.

Watching them feed is like magic - they hover and dip their beak into the feeder and then rapidly fly back to hover a foot or so from the feeder before coming in for the next sip. We often sit watching them through the window a few feet away from us as they feed.

If you are outside they sound like large bumble bees as they hover.

I took this photograph from about 10feet away in full sunlight at 1/1600s - even at that speed the wings are blurred from their movement.

-----

Edit

"A human kind of human" reminded of the Sunbirds of Africa - I took a picture of one (not hovering) while I was there last October.